s
Home Distillation of Alcohol (Homemade Alcohol to
Drink)
Designs &
Plans
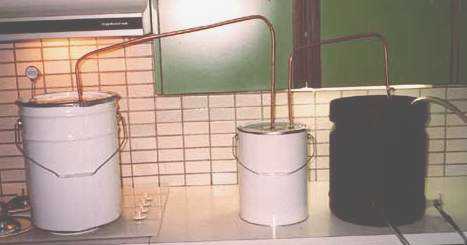
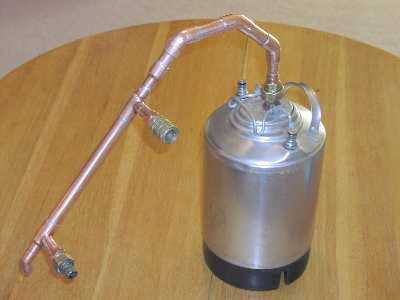
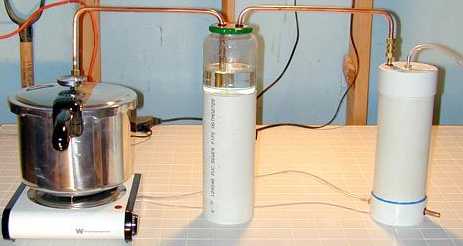
Check out the Photos of Stills section to at least see what
they should be constructed like.
Both Pot & Reflux stills are relatively simple and both produce
liquor. The difference is just that for a reflux still you have a
packed column before the condensor, and you get some of the vapour
to condense and drip back through the packing. You do this if you
want to make clean/pure/tasteless alcohol of around 75%-96% purity
for adding flavours to, or making gin/vodkas etc.
If however you just want to make straight forward whiskey /
schnapps etc with some flavour, you can use either a pot or a
reflux still.
An interesting note is that some copper in the vapour path is
benefical. See the Materials
page for more details why. Some people who have built all-stainless
steel stills have found there to still be some smell +/or odour in
their neutral spirits, which goes away when they put some copper in
(usually replacing the scrubber packing with copper scrubbers).
Reflux Still Designs
For neutral spirits you want a reflux condenser, so that the
falling precondensate washes the rising vapour, reducing the water
and impurity content, giving a cleaner, safer, and higher purity
product. The more contact you can achieve between the liquid &
vapour, the cleaner and purer the product will be. To do this,
increase the reflux ratio (the ratio of liquid falling to vapour
rising) and the surface area that it is occuring over. A reflux can
be made by packing the upper section of the column with inert
packers (eg marbles (OK), rachig rings (better), or best -
stainless steel pot cleaners (the ones that look like little
springs, NOT the fine weave ones, or God forbid, those already
soaped ready for use)), and cooling them by wrapping the cooling
water hose around the outside, or passing a couple of cooling lines
through the top of the column. Even better is to have either a
separate condensor above them, or best - totally condense all the
vapour above the packing, divert some to keep, and return the rest
to the top of the packing.
Plans for Reflux Stills
- One of the simplest and most effective designs is that from
John Stones "Making Gin & Vodka" book - the "offset head"
design. Theres heaps of photos of this, including detailed
dimensions etc from Matt, on the Offset
Head Photos page. I have one of these myself, and its bloody
fantastic. It should be your first choice.
- Many different designs & their construction are covered in
Mike Nixon and Mike McCaw's "The Compleat Distiller"
(Dec01), available from http://www.amphora-society.com.
- Another resource on how to make a Reflux still is
Bob Lennon's Build a World
Class Distillation Apparatus site (and its FREE !). Informative
& very good. Heaps of details, illustrations, &
explanations. Check out the Photos page
for the modifications Rob van Leuven has made to his Stillmaker -
its now puting out 95% purity too. Update
! Site recently (Aug01) updated to include a new valved
reflux design, using a beer keg for the pot. Download his site and
the still plans, for FREE, either as a Word document, PDF, or Zipped
HTML file (each < 2MB).
Tony :I also have copies of these files :
orginal design (681 kB) & Valved reflux design (2.06 Mb). In my opinion the designs can be improved - if building
the original design, move the through-tubes to the top of the column - heaps of discussion why
on the Reflux Design page, and if making the valved reflux design (which is superior to the original by a long shot !), make the overhead condensor narrower - to fit into a 2" not 3" section, and fill that center gap with some scrubbers - less chance of vapour sneaking up through the center that way.
- Jan also has put together
some really good construction instructions at his Distilling page.
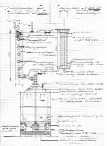
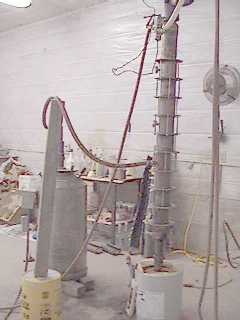
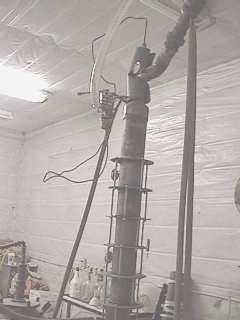
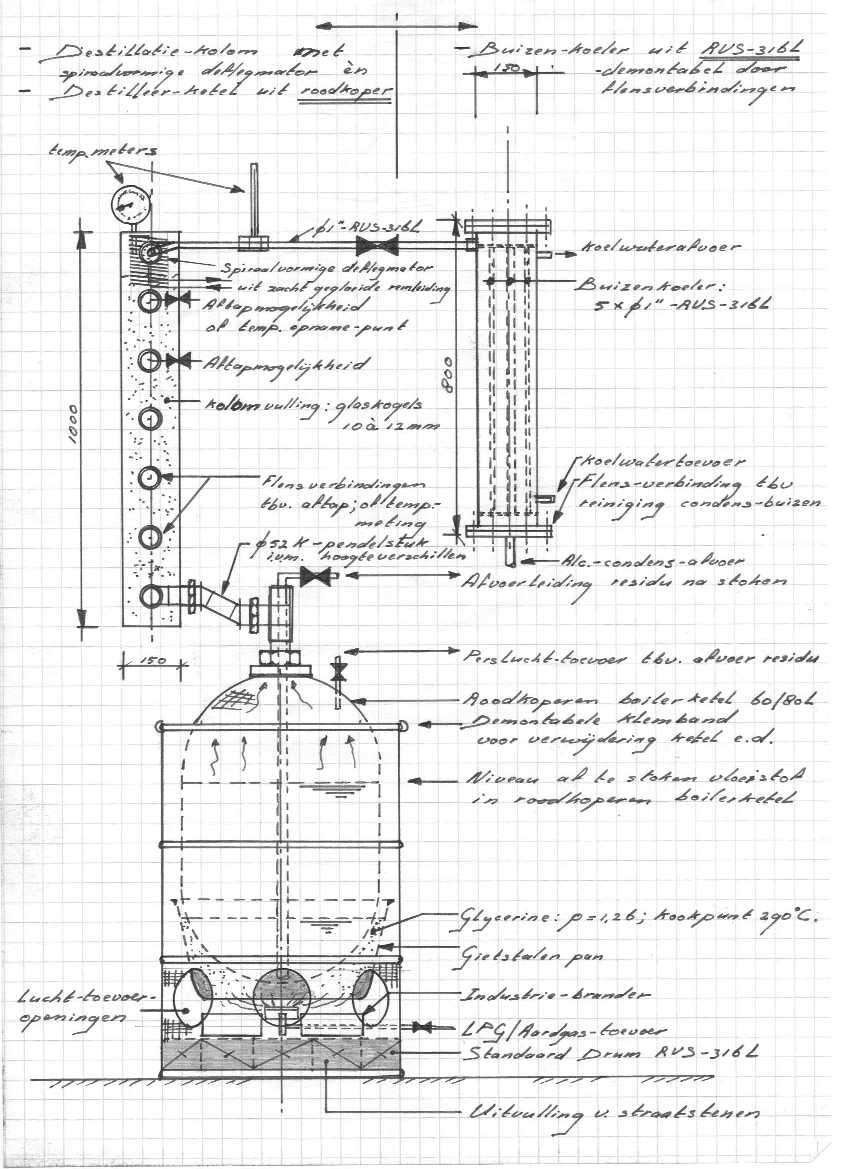
- Peter in Holland has a diagram of his reflux still design, and
the trays he uses in another still (see the photos page). Click for larger pictures :
- Ian Smiley's book "Making pure corn whiskey" has very detailed
instructions for building the Offset head design: http://www.home-distilling.com
- StillCookers page at http://us.geocities.com/stillcooker/index.html
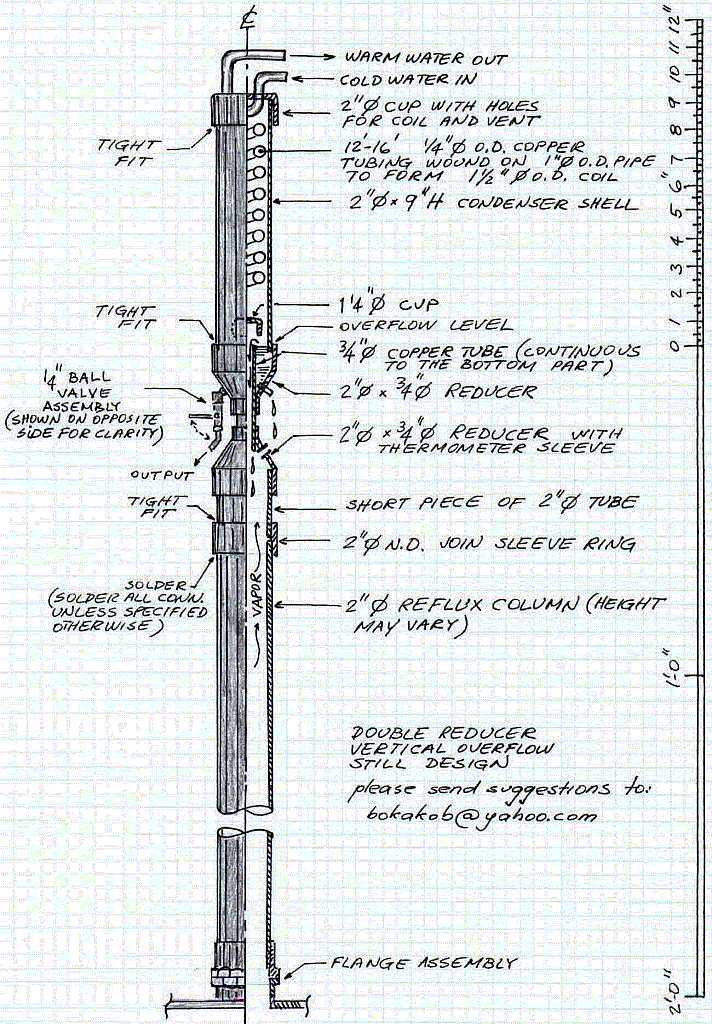
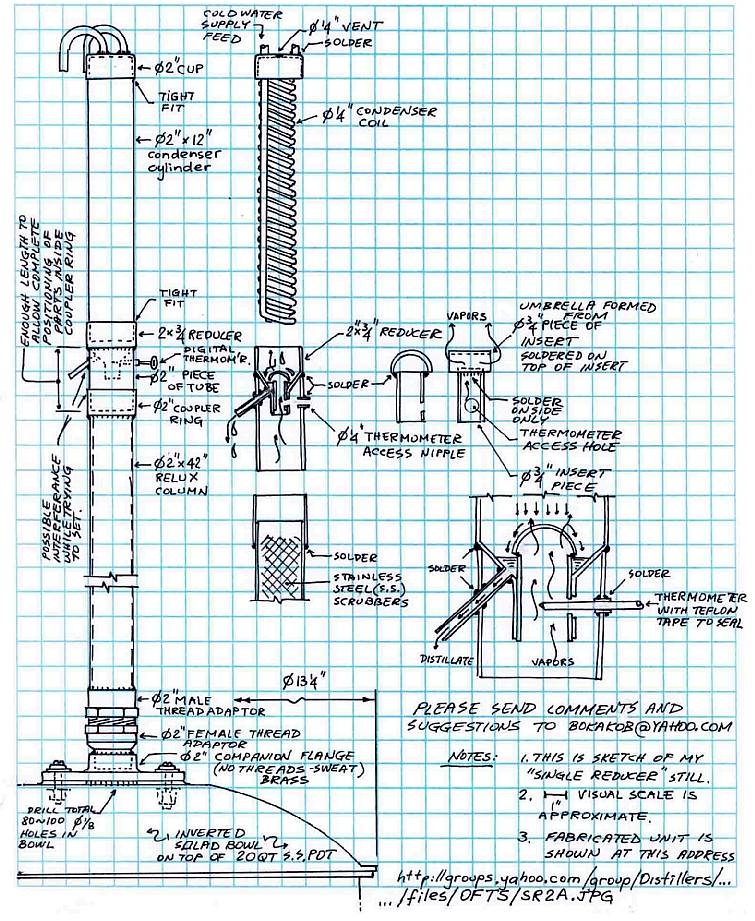
- Alex (BOKAKOB) has developed a great design (and variations).
For the complete page of all his photos & instructions, see
BOKAKOB.
 |
DR - straight forward and easy to repeat
SR - a bit more difficult to repeat but it costs less and
less tall.
EL - elegant (IMHO) and somewhat challaging to repeat. The cost is
much less.
The whole thing assembled is here: http://groups.yahoo.com/group/Distillers/files/OFTS/DR/SR2A.JPG
The good about this design is that everything is detachable,
cleanable, interchangable and modifiable.
Personally (Tony) I think that these are one of the best designs available. If you're asking me which
one to make - this is it (any of the three heads). Just remember to insulate the column.
|
There is plenty of information too on stills for making fuel
alcohol. The Journey to
Forever site has the following plans ..
see also
Distillation of Alcohol and Denaturing by FB Wright, 1907 - available as a free download.
If you're looking for a supplier of small needle valves to use in these stills, try either hardware shops, or supliers of gas fittings for BBQ's or camping equip.
Pot Still Designs
There don't seem to be many instructions around for how to build
pot stills. I guess this could be because there are just so many
ways, and it really depends on what you have available to you. One
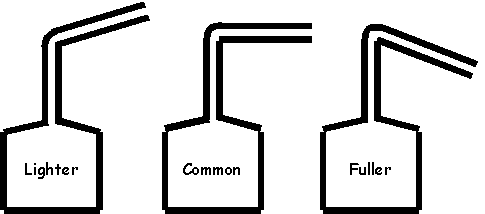
factor to consider is the angle of the lyne arm. Even with a pot
still you get a little bit of vapour condensing on the head &
arm, and running back down into the pot as a bit of reflux.
Depending on how much internal reflux is going on, the flavour will
vary. An upward sloping arm will cause much to run back into the
pot, thus cleaning & lightening the vapour more, whereas a
downward sloping arm will send all the vapour towards the jar, and
you'll collect a heavier flavour. See my Photos of Distilleries and Photos of Stills sold commercially pages to see what
variations in this are around in commercial distilleries, and Portugese Copper Alambics and Alquitars. Some also
have a bulge in the head. This constriction then expansion causes
some of the vapour to drop out, and again increases the reflux, and
lightens the spirit.
Jack writes ...
For a potstill, I've found that
the lyne arm (as it comes off the still body) should go up at a
45degree angle for 2 feet, then it should drop into the condensor.
The diameter of the tubing depends on the heat - for most stovetop
models (typically built out of a pressure cooker) 1/4 to 1/2inch
tubing is used for the lyne arm and the condensor. The narrower the
tubing is, the lower the heat setting you need to use. The
condensor running off of your potstill can be whatever diameter you
have (provided it's no smaller than 1/4"). Also, remember that you
don't have to have a coiled-tube condensor- you can use a jacketed
model just as easily. With stovetop potstills there is a lot of
room to adjust the materials dimensions, because the heat source is
so easily adjusted.
Wal elaborates ...
The shape and height has an effect
on flavor.
- Traditional Alambic. This is descended from stills used by
alchemists. It consists of a domed cylindrical boiler with a
bulbous still head. It sits in a brick furnace. From the still
header chamber, the lyne arm usually slopes downwards or is
U-shaped ('Swan's Neck'). The condenser is a coil in a tank of
water. Raki stills, moonshine stills and the 'Alambic Charentais'
for making cognac are examples.
- Varied Boiler shapes.
- Conical, classic whisky pot still ('Springbank'
whisky)
- Onion shape, slightly fatter than the classic shape
('Glenlivet' whisky)
- Pear shape ('Vintage Islay' whisky)
- Varied Neck (Column) shapes and heights.
- Conical column from boiler. The smallest whisky stills are at
'Edradour'and the tallest at 'Jura', 'Bruichladdin', 'Glenfardas'.
The stills at 'Glenmorangie' whisky distillery are ex gin stills
and are the tallest at 5.3m
- Boil ball and conical column ('Strathmill' whisky)
- Boil ball and cylindrical neck ('Lomond Still')
- Additional reflux feature in column. Column length and the
Milton Ball header chamber create reflux, but some necks are cooled
with running water to increase reflux ('Fettercairn' whisky). The
traditional Australian brandy pot still has a 'Brandy Ball' water
jacket at the top of the column. All are open columns. The 'Lomond
Still' has 3 adjustable plates and is used as a wash still at
'Scapa' whisky distillery.
- Carterhead Still. The column contains a basket holding the gin
botanicals ('Bombay Sapphire' gin')
- Varied Lyne Arms.
- Horizontal
- 30 degree downward slope
- 30 degree upward slope ('Deanston' whisky)
- U-shaped or'Swan's Neck'.'Alambic Charentais' for cognac,
'Plymouth' gin', 'Talisker' whisky, 'Lagavulin' whisky.
Ian Wisniewski's article "Still
Very Important" in "Whisky Magazine" describes in
more detail how the shape of the still can affect the flavour...
Big thanks to Whisky Magazine for permission
to reprint the following
Knowing that stills of a certain size and
shape yield spirit with a particular flavour profile is all very
well, but applying this knowledge the other way around is far more
challenging. In fact, designing stills in order to produce a spirit
with specific characteristics is merely a starting point, as this
is only one factor in a complex (and not always fully understood)
equation, which also includes the spirit cut, heating method, rate
of distillation and type of condenser.
Even the relationship between the wash and
spirit stills is difficult to quantify beyond stating that new make
spirit is shaped by wash stills and refined by spirit stills. But
if the low wines aren’t right, the spirit stills can’t
correct them (and if fermentation is mismanaged, distillation
can’t fix that either).
(snip)
As the degree of reflux (condensation) is a
key factor in establishing the profile of the spirit, the length of
the neck is an important consideration. The taller the still, the
greater the degree of reflux. This is because heavier, denser,
oilier flavour compounds have a higher boiling point than lighter
flavour compounds and as they rise up the still the temperature
becomes relatively cooler, which means they condense and return to
the boil pot (base).
(snip)
As a shorter neck means less temperature
variation, there is consequently less reflux. This promotes the
progress of heavier flavour compounds into the condenser, yielding
fuller-bodied spirit, with a creamier, earthier, oilier
texture.
But size doesn’t always matter, as
reflux can also be enhanced by customising stills with various
matching accessories, including a boil bowl, pinched waist or flat
top, while cooling the neck of the still is another
option.
A traditional (cynical) explanation for a
flat topped still has been the low ceiling it had to squeeze under.
However, the technical influence of a flat top, as at Cragganmore,
results in a slightly higher degree of reflux because the progress
of vapours is not as gradual or progressive as it is with a swan
neck.
A pinched waist (as though a corset had been
tightened around the still), can be seen in The Glenlivet’s
wash and spirit stills. By reducing the surface area available to
the vapours (by about two-thirds at The Glenlivet), a pinched waist
initially accelerates the progress of vapours into the neck. The
subsequent, sudden widening of the neck, and relatively cooler
temperature, consequently increases reflux.
A boil bowl (bulbous section between the boil
pot and neck) can vary from being mildly to acutely convex (the
more convex, the more reflux). When vapours carrying heavier
flavour compounds expand into this larger, relatively cooler area,
they condense and return to the boil pot.
Dalmore Distillery effectively doubles up by
having a cooling jacket (also known as a water jacket) between the
boil bowl and neck of the spirit still through which cold water
circulates (using the same water source as for the condenser). This
practise dates from 1839, with the oldest jacket still in active
service dating from 1874.
At Fettercairn a different approach yields a
similar result. From a circular pipe located at the top of the
spirit still, cold water runs along the neck and collects in a
trough fitted around the still (from which it also drains). This
has the effect of “giving the vapours inside a little
fright” according to Distillery Manager Willie Tait. His more
technical explanation is that cooling a fairly short neck gives it
the effect of being much taller.
While purifiers are rarely seen, this is a
feature of Glen Grant’s wash and spirit stills. As vapours
leave the still and enter a copper pipe in a tank cooled by water,
lighter elements within the vapour continue onto the condenser
while heavier elements return to the still via another pipe.
Without this proceedure Glen Grant’s new make spirit would be
oilier and heavier, says Chivas Brothers’ Brand Ambassador
Jim Cryle. Similarly, in the opinion of Site Manager John Reid, a
purifier in the spirit still increases the buttery, creamy notes of
Edradour’s new make spirit.
But just as important as design features that
make a still unique, is the manner in which the still is employed.
Pungent, fruity esters are more evident in spirit collected between
68 and 72% abv, while a spirit cut extending to around 58% abv
includes heavier, oilier, fatty acids. Consequently, altering or
separating the spirit cut into batches collected at different
strengths would enable varying styles of whisky to be produced from
the same still.
(snip)
How [heating] is utilised also affects the
degree of reflux. Heating the still more rapidly increases the rate
of distillation, driving off vapours more readily. As this reduces
the degree of reflux, it promotes a higher proportion of heavier
flavour compounds. Driving vapours more rapidly also entails the
risk of carrying over some undistilled liquid, showing as a sour
note in new make spirit. Correspondingly, a lower temperature means
a slower rate of distillation, more reflux and a lighter (some say
finer) spirit. At the leisurely end of the scale this means
collecting around nine litres of spirit per minute, compared to
around 20 litres per minute in the fast lane. Additional reflux can
also be prompted en route to the condenser, using a lye pipe (or
lyne arm) extending at an incline, which drives heavier flavour
compounds back into the still.
By providing a greater surface area than a
typical worm, a modern ‘shell and tube’ condenser
increases the degree of contact between the spirit and copper,
helping to strip out meaty, sulphurous compounds. However, worms (a
coiled copper pipe of decreasing diameter, set in a worm tub with
cold water) do not neccessarily result in a higher level of
sulphurous, meaty flavours and the challenge lies in controlling
the level of these characteristics to achieve a complex
whisky.
(snip)
So, knowing these principles, is it possible
to quantify the importance of the stills within the production
cycle? Well not easily, that’s for sure. Beyond the usual 60%
of the malt’s eventual flavour being attributed to
maturation, I’ll leave dissecting the balance to an expert.
“Less than 10% is accounted for by the barrel’s
previous incumbent, then maybe 5% is influenced by the barley
variety, and 5% by the strain of yeast,” says David
Robertson, The Macallan’s Master Distiller. Then the crucial
bit. “10% could be the wash still and 10% the spirit still,
with the influence of the spirit still being divided into 5% each
for the size and shape of the still and 5% for the spirit
cut.” Sounds good to me.
Plans for Pot Stills
Regarding using pressure cookers, Jack cautions ...
I've used them- I hate them. The
pressure release valves ALWAYS leak (fire hazard, and damned
wasteful), thay always come coated in some impossible-to-remove
grease, the places to mount the thermometer is always guaranteed to
give false readings (either high or low, never the same twice).
They are expensive, heavy, the aluminum model pits to easy, and the
steel is to expensive (with the same problems except pitting of the
metal). Don't bother. Get a small keg or 5 gallon drum that's
stainless and food grade- I've seen them for from $20 to $40US. Or
get a milk can (US$100) expensive, but attractive.
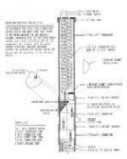
Below is a diagram of Harold B's pot still. Very cheap and easy to
make. Harold suggests that you should adjust the heat so that the
lower end of the condensor can be touched. The reason for this is
that you can see water vapour if things are too hot, but you can't
see the alcohol vapour.
Another great simple design is Geoffs..
Walter describes his pot stills ... "Volodia's Samohonka 1&2"
Inspired by folk stills in Jamaica
and East Africa made from 44gal drums, (see "Alcohol in East
Africa. 1850-1999" - www.dur.ac.uk/History/web/distillhist.htm)
I made an urban version using:
-
- Pot : 5gal (20 L) open top paint container.(These can be
ordered in new from some proprietary paint chain outlets/paint
trade oulets, or get some free from painting contractors and clean
them with paint stripper/turpentine (I have done this before I
found a source for $AUS15 ($US7.50) "Ameron" coatings makes a heavy
gauge container for their industrial coatings. The parent company
is in the U.S. The paint company "Solver" in Australia can get
unused containers through their chain of shops. Container
manufactures sell them quite cheaply but only in lots of 50 (I
enquired). Cleaning free empties is not too difficult. and helps to
recycle them. I know a local owner of a paint store who recycles
them into kid's rubbish bins with appropriate designs on them - why
not something more useful!
- Outlet arm - 1.5m of 10mm (3/8in) soft copper tube, bent to
form a "lyne arm",up 200 vertically & then 600 long inclined
upwards (to get some reflux) and then down 700 vertically. The 10mm
soft copper tube is easily bent without flattening - use salt
inside the tube to help prevent this, standard grommet for plastic
beer fermenters, or improvise using cut sections of synthetic wine
corks glued to both sides( they close in well).
- A 500 long Leibig condenser over the 700 copper tube section
out of plastic T sections (2 x 19mm/13mm (3/4in,1/2in) barbed PVC
Tees) & 500 length of 19mm (3/4 in) plastic tube, clamps,
silicone or epoxy resin, plastic glue.
- Rubber grommets (as for plastic fermenters)
- Plastic tubing - standard 13mm (3/4in) plastic tubing with
plastic tap to hose connector, 10mm tubing for distillate (this
fits on the 10mm (3/8in) copper tube), and for the water outlet
from bucket to sink.
- Gas flame diffuser mat or bain marie (water bath) to get even
heating.
- Thermometer -digital or mercury to measure pot vapor temp. Stop
distilling at 91C (196F).
- Thumper/Doubler - 10 L (21/2gal) paint container, with rubber
grommets for copper tubing.
- Worm condenser variant - 20L (5gal) plastic bucket or cut down
container, coiled copper tubing, grommets.

No welding - just glue, silicone, clamps. All this is sitable for
most kitchen stoves and sinks. Obviously this is an introductory
still for the beginner.Paint tins are not heavily coated. Kept dry
it should last years - rust remover will extend this.
I forgot to mention Safety aspects important as we don't want
kitchens going up in flames! I switch the exhaust fan on to take
away any stray fumes, even though the ring clamp is air-tight. I
made the lyne arm quite long for partial reflux and to take it away
from the stove. The distillate outlet tube goes down to the floor,
well away from the stove. An electric stove might be safer,
although apparently slower.
MooNShiNeR describes his 75 gallon pot-still, doubler and shotgun
condenser below. See Moonshine Still
Photos for a couple of photos of it.
I use a medium sized (75 gal) pot
still with a doubler/thumper (5 gal) and a shotgun condenser for my
purposes. I also utilize a 20 gallon outfit with a 1 gallon doubler
and a worm condenser mainly for running smaller batches and
epecially for running backings or low wines to "up" the proof
quickly.
I use copper sheets soldered with silver solder to build most of my
components. Shotgun condenser made from of an old, antique copper
fire extiguisher. Cut both the ends off and sand everything inside
and out. Clean it to the "eat off of it" stage. Cold water enters
the shotgun condenser from the bottom and exits the top to force
the hot water out and this always keeps the bottom part of the
condenser way-cool.A shotgun condenser is basically a condenser
with a water jacket too cool the steam and it has dozens of 3/8"
copper line that the steam goes through. It's kinda hard to
explain. Where the steam goes through looks like the business end
of a gatlin gun. Bore two holes in the jacket about 3" from each
end and solder a brass hose copper garden hose connector in it, top
and bottom. On the one you use for the bottom, you will put a
spigot used to regulate the amount of cool water coming into the
condenser. On the top one you'll attach a garden hose and lay it
out where the hot water can drain off the top of the condenser. Two
copper sheet circles are cut and clamped together and numerous
holes drilled through them. The circles are placed inside the
copper jacket and spot soldered.(silver) in place with a few pieces
of the 3/8" line in to keep things lined up good. The lines are cut
about 4" shorter than the jacket. Start putting the lines in and
soldering them in place and solder the circles in good, top and
bottom.
On the first run, you'll be able to tell if you have any leaks or
not. you can fix them if it does.
Make a tight fitting cap for the top to be sealed/pasted on with
corn meal and water. The bottom does not require a tight fit at
all. It is just there to collect the alcohol as it comes through
and then out to the jug/bucket. With a shotgun condenser, you can
fire the still as hard as you want to and you'll have no problem
with it not keeping up. That's why people who do volume like them
so much.
A. Nonimus suggests ..
First off - most homemade
potstills in the U.S. are made out of 20 litre pressure cookers
(they have all the fittings you need including pressure release
safety valves)- If this is in fact what is planned, you MUST
remember to NOT PERMANANTLY MODIFY THE PRESSURE COOKER IN ANY WAY
-(remember, 3/8" copper tubing makes a nice coil, and fits the
outlets on most stills!) if the law gets news about you running
your own still- they can (with a warrant- not hard to get anymore,
I'm afraid) raid your place, if they find a pressure cooker with a
bunch of copper tubing attached to it, and holes drilled in it that
are homemade- they will have the evidence needed to take you to
jail for running a still. IF the pressure cooker is always returned
to it's original state (normal fittings and weights) after you
distill with it, and if you put your condensor next to some beer
making supplies (or, rather mash making supplies- same thing)- when
(if) the cops show up, they find a normal (unaltered) pressure
cooker and something you will swear up and down is a wort chiller
for the making of beer. If no moonshine is found- they have
absolutely no case against you.
Second - The average 20litre pressure cooker can be set inside a
large stockpot (the 30 quart or larger models, just measure the
cooker, and go out shopping for a cheap canning pot big enough to
hold it easily). By placing 2 pieces of wood, pipe, etc. accross
the top of the canning pot, the handles on the pressure cooker will
sit on these cross pieces- this will keep the bottom of the
pressure cooker off of the bottom of the canner. Fill the large tub
with water and then fill the pressure cooker/potstill with your
mash and cook with a nice even heat (if using gas this reduces the
fire hazard as well- now the alcohol isn't in direct contact with
the metal touching the flame). This allows you to distill mash that
has a lot of solids (the more gentle heat helps prevent sticking
and burning), it also allows you to do something else while warming
everything up- Just put the water on to boil, and put the canner in
after the heat is where you want it- better temp control- and
unlike the still- you don't have to watch the water heat up (unless
you are bored out of your mind)- just make sure the potstill body
isn't touching the metal of the large stockpot (The "jacket")-
there you go- a homemade steam heated still!
Toms potstill ..The boiler is a 2.5 gallon soda canister. I heat
it by securing it in a pot of boiling water, and run it like a
double boiler. It works great!
Thumpers, Doublers & Slobber
Boxes
Some moonshine stills have a "thumper" or "doubler" between them
and the condensor. This is a jar of sorts, half-filled with liquid
(water, mash or tails). See the Moonshine
Photos for examples of them.
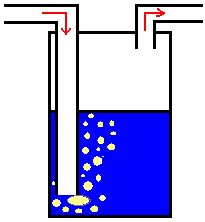
Thumper
This acts as a simple second distillation stage. Once its fully
saturated with alcohol (hence better to start with something
already containing alcohol), and up to temperature, the vapour
leaving it will be doing the equivalent of a second distillation
(usng the incoming vapour as the heat source) (see the wee applet
in Reflux Design ... set it to
2 stages .... so the vapour leaving a 15% wash will be coming off
at 65%, after going through a second stage (the thumper) it will be
at 85%).
Rudenoise's pot still shows an excellent example of a thumper in
action ...
I wanted to start out with a small still and this was the answer.
In a matter of four hours I had a still made, using 3/8 copper
tubing I made a condenser and encased it in a PVC jacket with water
circulating through it. I use gromments to pass the copper coil
ends through, and some brass nipples for a water entry and return,
this is hooked up to a small tabletop fountain pump in a bucket of
water that circulates the water through the jacket. It really works
well. I used the stainless steel cooker. I first primed it (for no
better term) on the stove with water prior to modifying it. While
still warm (cooker) I washed it with soap and water and this took
care of the grease they lubricate the lock with. In addition I
added a "Thumper" or "Slobber Box", using a pickle jar and a couple
rubber grommets (works great), and a hotplate.
How does this work ? I'll try and describe it ...the main pot heats
up, and begins giving off ethanol vapours (say at 40% purity at 96
° C off a 5% wash)... these get passed into the thumper and try
to bubble up through the liquid there. But because the liquid is cold
too, the vapour will all condense if given the chance (e.g. small
bubbles & water deep enough). A bit later on, the thumper liquid
is starting to heat up and increasing in ethanol content .... soon
the thumper is at say 84 ° C, and the ethanol content is around
40% - gees - that sounds like a second pot still doesn't it ? So
the ethanol starts coming coming out of solution, though this time
it will be at around 75-80% - hence the second distillation
occurring - all for free, no additional cost or heating involved.
Of course all this depends on how effective the thumper is at
knocking down the incoming vapour - e.g. bubble size, depth of
immersion, % alcohol in the vapour & thumper liquid etc, but you get the basic idea.
Look at the energy involved ..
Heat of Vapourisation/Condensation
Water = 2260 J/g
Ethanol = 855 J/g
So an incoming stream of 40% ethanol will give up about 1698 J/g,
whereas to vapourise a 75% rich vapour needs about 1206 J/g. Then
given that the flowrate of the 75% product is going to be only just
over half of that entering, you have HEAPs of energy left over, to
first heat the liquid there during the inital phase, then to
superheat the vapour once the thumper is up to temperature. So the
stuff coming in can more than happily look after itself in terms of
redistilling itself.
I have a spreadsheet Thumper.xls
which does these calculations for different scenarios.
Play with the spreadsheet, and test the various scenarios ....
- Thumper vol 1000mL and 0%
- Thumper vol 1000mL and 30%
- Thumper vol 3000mL and 30%
With a small thumper volume, the contents are fairly quickly heated up
towards the liquid boiling point, but its % alcohol is quite low.� For this
situation, the vapour then tends to bubble up through the thumper, with no
further enriching.� What goes in is what comes out - no real increase in
purity.� The extreme case is one where the thumper acts to strip alcohol
from the vapour, and produce a lesser strength vapour.
This situation changes a little if the small thumper is initially charged
with� a liquid of high % alcohol - eg the tails from the last run, say at
30-40%.� In this case, the excess energy available is sufficient to cause
the thumper to act like a second distillation stage - once its up to the
boiling point of the % alcohol in there, the energy goes into vapourising
the vapour there, producing an output quite a bit higher in % than the
vapour entering from the pot still.� Unfortunately, because of its small
volume, this isnt sustained for too long, all the alcohol is driven off,
and past a particular point in time, the thumper then simply lets the
vapour bubble through & do nothing further, if not actually stripping the
vapour & producing less than that off the potstill.
The best scenario for the thumper is where it is of quite a large size, and
charged initially with a reasonable % alcohol. Even starting it with the
same % wash as that in the pot still is an advantage.� In this case, the
excess energy from condensing the pot still vapour goes into releasing a
vapour of quite a high % alchol, always higher than that exiting the pot
still.� In this scenario, the thumper is a benefit, as it allows quite an
enriching of the vapour to occur, with no additional energy required.� The
only condition is that the thumper is charged with a liquid of a reasonable
% to begin with - if simply filled with water it wont work.
To make the thumper effective you want
- lots of vapor liquid contact, ie heaps of small bubbles - eg
use a screen or simply lots of pinholes in the bottom of the inlet
tube.
- the liquid in the thumper to begin high in alcohol, so a small volume of wash or, maybe
better, tails from the last run. Deb recommends .. You put tails or mash into the
thumper - not water - and the loss is not a factor compared to the
resulting alcohol content :) I highly recommend a thumper!
- larger is beeter than smaller. For sizing a thumper, Ted suggests ..
A good rule of thumb is make the
thumper twice the size of the amont of distillate in a single run.
ie: one run = 1 liter of spirits then make the thumper 2 liters
.... as a minimum, have it at least 1/3 the volume, ie ((#gallons
of wash * %alc of wash) / 3), or if using tails in the doubler,
((gallons of wash * %alc of wash + gallons of tails * % alc of
tails) / 3). I myself prefer to use a larger size to allow for
condensation that always seems to overflow the thumper. My
grandfathers still was 250 gallons and had two 50 gallon thumpers
as well as a 50 gallon slobber pot.
Jim writes ...Run your doubling keg in a water bath makes a good drink and it's pure. Do not add no liquid it makes it's own liquid
Note that thumpers aren't the same as slobber boxes (although they
look fairly similar. The inlet in a slobber box doesn't extend down
into the liquid, so no bubbling & hence further distilling
takes place. Rather, it just provides a place for any rubbish (ie
foam, mash etc) pushed up the neck of a pot still to settle out
before entering the condensor. They sometimes have a small drain
cock on the bottom of them to help empty them while the still's
running. The original purpose for a slobber box was for stills heated
by a fire beneath them - if the heating got too vigorous, and the contents
foamed or bubbled up into the lyne arm, that it would settle out in the
slobber box rather than go and contaminate the main spirits being collected.
They're not needed on well controlled stills.
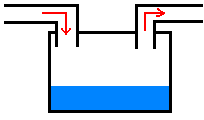
Slobber Box
Gin Heads
David writes ..
A Gin head is a large separate
compartment that sits above the boiler on a gin still in which the
botanicals (juniper berries, coriander etc.) from which gin gets
its unique flavour are placed and through which the the alcohol
vapour must pass before it enters the column. As such gin stills
are pot stills rather than reflux. They are still specifically
designed for making gin although they are and can be used for
making other similar drinks. As such they have mostly been made by
one British company for the last two centuries although I dare say
there are now other companies that make similar stills elsewhere.
Steam or vapour distillation is better at extracting essential oils
and other more soluble components as compared to steeping which
tends to extract tannins, phenols and the more harsh bitter
components.
UPS adds ..
A gin head still is a pot still
that has a basket like arrangement just at the start of the "lyne
arm" (the part of the condensor coil that is coming out of the top
of the boiler, but has not yet entered the cooling tank yet). In
the basket goes the botanicals that turn what is essentially a
vodka into a gin. This is the method that Bombay uses among others,
and is thought to give a more delicate style of gin. Nothing really
fancy, just a basket sitting on top of the boiler before the
condensor- if you lookat some commercial distilleries pics, you
often see a swollen bulb at the top of the still where the
condensor line runs out from - if a basket arrangement was put
there it would be a gin head still - appearantly, many scotch
distilleries use a gin head still - they just don't put any
botanicals in it. This is a holdover from the days in England when
gin was the most common (cheap) drink to be found- when gin's image
crashed the scotch distilleries bought the surplus
stills.
Ted also adds ..
A gin head is a pot or column that
steam travles through enroute to the condenser. A thumper works
rather well. Just pack it with the herbs and run clean drinkable
60% ethanol in your still for gin. Pack it with peppermint to make
schnappes. Pack it with... well you get the picture. Put just water
or varying amounts of ethanol in the still for making oils from
mint or whatever has an oil contenet.
Condensers
I have done a wee interactive calculator to help with sizing condensers.
Andrew advises ...
One of the easiest ways to
increase a heat trasfer coeficient is to increase the velocity of
the fluids. Temperature of the cooling medium helps, but velocity
is MUCH better. This is why blowing on a spoon full of soup with
your breath (about 90degrees F) cools it off much quicker than
holding it in front of your nose, even on a chilly morning. What
I'm getting at is that close clearances are desireable, as you will
get lots of heat tranfer into your cooling water.
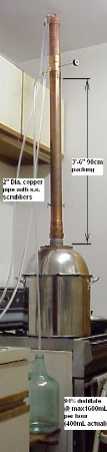
A good design, utilising this is Tom's version, used in a
Nixon-Stone settup - see here
for his diagram.
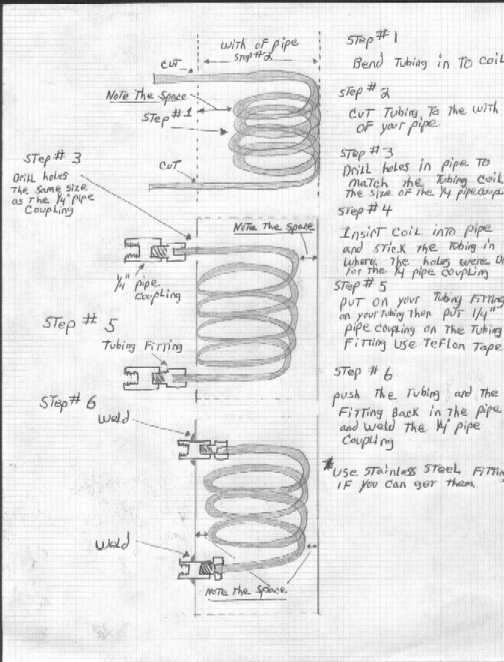
If you're wanting to make a condensor coil, like the Nixon-Stone
style ...
Paul offers ..
if you are going to bend copper,
get a tube bender. This is a wound steel spring that allows you to
bend tubing without kinks. Your hardware or plumbing supply can
help.
and John ...
Spring-benders while they aid in
crude tube bending can be replaced with a die and mandrel type of
bender. This will yield uniform bends.These benders are available
from "Imperial Eastman Co." For larger diameters anneal the bend
area, cool,pack with sand and form over wooden die that has been
fabricated to match bend radius. This procedure will elevate the
finished product above the amateur level.
You just need to evaluate if the extra cost is worth the extra
quality.
Jack suggests ..
A fancy mandrel type of
arrangement is easier to get than you might think - most people in
this area just wind the copper tubing around an old paint can. It
works a lot better than doing it by hand or with a spring tubing
bender. Past about one half an inch in diameter it gets to be a
little hard to do.
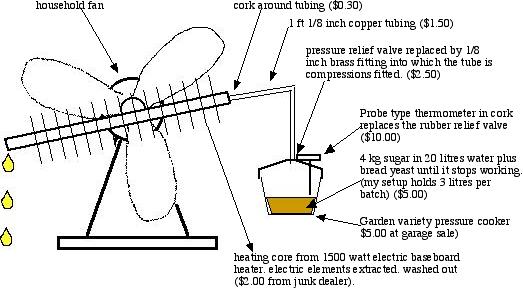
Another approach is to air cool the distillate. "Vonmantik" writes
..
I had the fortune of befriending
an old distiller from the smokey mountains who had a ten liter
cooker with reflux tower. The unusual part was that he had designed
a air cooled condenser. It was made of about 25ft of 3/8 copper
tube coiled tight and centered in about 4ft of pvc pipe, on top was
a small box fan (from a recycled computer) that drew air through
the pipe. Intake was controlled by a homemade collar with allowed
the operator to contol air flow. This an idea that can be expanded
on it there is a problem plumbing water to the place you want to
set up.
Homer has a diagram of how he has fitted the coils into his reflux
column. Click for a larger diagram :
Walter describes the "gattling gun" condensor ...
I noticed that the N-S stills have
a coiled vapor condenser consisting of 3m of 5mm tubing through
which water flows, and from comments seems inadequate. What about
using a mini shot-gun condenser? On a typical 50mm diam. column
this would mean say a 300mm length of 50mm tubing, with a plate on
both ends with 12 holes drilled in a geometric pattern to take 12,
5mm open-ended tubes welded in place. It is still open to the sky
for safety. On the side there is a water inlet at the bottom and an
outlet at the top for the cooling water. In effect we have 3.6m of
vapor in 5mm tubing surrounded by cooling water rather than the
other way around. The unit can be welded on the top or attached by
a standard 15mm threaded plumbing connector so that it could be
replaced if necessary.
Vacuum Stills
Using a vacuum allows the use of lower temperatures, and can attain
higher alcohol concentrations, eg at 42 mm Hg (cf 760 mm Hg =
atmospheric pressure) the column only need be at 35 C (ie just use
hot tap water to heat with). The azeotrope (the point where
distillation ceases to work because the vapour and liquid purity
are the same) moves towards 100 % as the pressure is lowered; below
0.1 atmospheres it disappears, allowing you to distill all the way
to 100% alcohol (provided you beef the reflux ratio up to >20).
They can also be more energy efficient, and allow for a greater
capture of the available alcohol. The lower temperatures also mean
that they're use a bit in the distillation of essential oils (which
would be otherwise be broken down at higher temperatures).
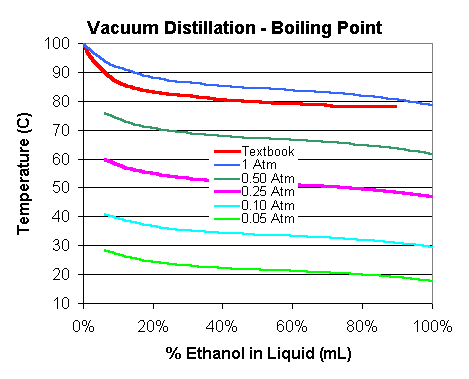
The graph below shows the reduction in temperature. I'm not
quite happy yet with my calculations for this (the Textbook & 1
Atm lines should be the same), so don't go and design from it, but
you can see the basic principle at work ...
To create a vacuum, you can either use a mechanical pump, or a
a venturi ejector (water jet pump). The venturi ejectors (vecktors) are commonly used
by laboratories etc to assist with filtering material. They just use
flowing water to create the vacuum, and cost around US$20.
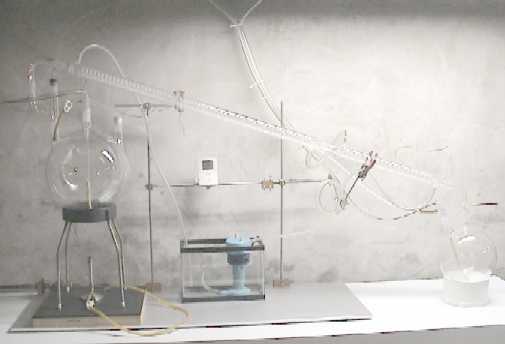
Joel describes his vacuum still
Not only is it all lab glassware
with ground glass connections....but the entire system runs under a
25"Hg vaccuum. The vaccuum makes the whole process much more
eficient and keeps the boiling temps very "true". The vaccuum is
also used to change batches without having to take anything
apart.
The tank in the picture is the main coolant resivior. I built a
cooling tank that sits outside and uses the cold winter ambient
temperatures to chill the coolant. It consists of a 35 gallon
garbage can with 125 feet of copper coils inside. The can is filled
with automotive anti-freeze and the little pump in the pic pumps
winshield washer fluid through the closed loop copper coil system
and then through the condenser coils in the picture. On a really
cold winter day....I can get a 100 deg. ambient drop between the
inlet and outlet ports on the chiller.
After distilling the "product" 6 times and paying close attention
to the temperatures (to make sure all the methanol has been
separated from the "good stuff") I end up with distilate at 180
proof that WILL NOT give you a hang over.
Ólafur describes his vacuum still ...
My pot is around 60L. It is
enclosed in a rather large plastic barrel and I heat the system
with hot water. The water is around 80C so I don't need a lot of it
and, besides, it doesn't cost a lot here in Iceland. The column is
2" X 60cm SS packed with ceramic rings. The water for the jector I
let straight through so as not to create resistance on the out end.
The cooling water I let in at the bottom end... The jector suck out
of my collecting jar which is in turn connected to the condenser so
any vapour rising up the column has to go through the condenser
before it gets to the collector before it gets through to the
source of the vacuum. The cold water in iceland is somewhere around
4-5 C so cooling is not a problem.
Note that in most cases, the vacuum is applied to the distillate
collection container, after the condensor. This way there is little
loss of vapour from the process, and there doesnt need to use much
vacuum. Many of the comments below are concerning the setup where
the vacuum is applied to the vapour line.
There are several problems with Vacuum stills though:
- you can lose some alcohol vapour out through the vacuum
pump,
- you must have an accurate measure of the vacuum applied (not a
big problem, one of the reasons the still is not easy to
build),
- its hard to find leaks (thus requires care during
construction),
- very low vacuums are difficult/expensive to attain (but
generally not required - only a small vacuum is needed), and
- the low temperature can make it difficult to recondense to
vapours (need realy cold cooling water & enough condensor
surface area)
Often the vacuum can be made by using a "Venturi" or "Vektor" which
uses the cooling water, and causing it to go through a small nozzel
increases its velocity. This causes a corresponding decrease in
pressure, and hence can "suck" vapour from the still. However, this
can eject some vapour out of the system.
The heating can be a simple water jacket around the pot, using hot
tap water.
What can also be confusing is when the mash begins to boil, the
vapours will expand into the vacuum space, and your gauge may go
back to zero. This doesn't mean you've lost your vacuum, but if you
can have some of your still appliance in glass or plastic so you
can see what is going on, this helps so you know you have some
action and not a leak.
One of our visitors is in the process of working on an improved
vacuum still design. We'll keep you posted once he's happy with the
results (including maybe a photo, design, info, history &
performance.)
David suggest how he would go about setting up a vacuum unit ...
I would go for a batch method
where the still, condenser, and receiver were under vacuum; cooling
would be circulated car antifreeze which was cooled with an
ice/salt mixture. The condenser would be a multi tube high surface
area low-ish volume of copper, the salt/brine would attack the
copper hense the car antifreeze. This would give a nice big temp
change. The pump would only have to maintain the vacuum so it could
be a smallish piston perhaps a good diaphram might do. The exhaust
routed through a secondary condenser although I wouldn't expect
much if the primary condenser was doing it's job, the reciever
could sit in a bucket of ice/water to stop any secondary
boiling.
Another way of cooling would be to use a freezer, make a dummy
door "if you want the freezer after" with a couple of holes in it,
inside have a tank of antifreeze and circulate this through the
condenser, it could run as low as -18 oC !. Any condenser after the
vacuum pump would only have normal cooling as it would be at
atmospheric pressure.
Tip if you're going to make a multi tube condenser these hints may
save you some time. The endplates can be cut from sheet copper or a
piece of tube opened out. Cut a circle out about 0.5 inch dia
larger than the tube. Find a socket from a car socket set about 3mm
dia less than the bore of the outer tube, trap the annealed copper
disc between a thickish "6-7mm thick" metal plate" in a vice, and
beat the edge of the copper over the socket. With dividers find the
centre of the disc on the inside not out. If you use 32mm bore
copper tube seven 10mm pipes will fit in nicely. Draw the 7 circles
evenly spaced. Don't try and drill the holes! it's disasterous!
Just drill a very small hole and use a metal cutting fret saw
better still a jewellers saw if you have one. I use mine frequently
it's a great tool. Make two plates. Silver solder or use the
copper/phosphorus rods to solder the 7 tubes to the end plates,then
slip the unit inside the outer tube, solder in place, make end
plates to reduce the size down to a more convenient size "you gone
metric yet" 3/4 or 22mm as we use here now.
Laurance adds ..
Don't use any old car antifreeze!
Any trance leaks will contain poisonous ethylene glycol. Use
propylene glycol (typically RV water line antifreeze or other
antifreeze for use in potable water systems)- it will work just
about as well and there's that much less chance of poisoning
yourself (with antifreeze, at least).
Plates instead of Packing
Gaw has made a hobby-sized column with plates in it, rather than
using packing. He elaborates ..
I built a bubble plate still using
the encyclopedia and the pics from message #1560 posted by Peter of
the Netherlands. Not being happy with the scrubbers or marbles and
not being able to afford the threaded unions he had used, some $200
US each, I created a bolt together system using stainless plates
from a salvage yard and 4 inch copper pipe. My still will now
produce 3 1/2 US gallons per hour of 95% after a thirty minute warm
up time, using two three KW elements in the main thirty gallon
boiler and one 1500 watt element in the smaller six gallon water
heater at the base of the still which I have converted to operate
on separate temp controllers.
Other Design Sites
Other design sites include :
Other texts which you'll find out there in the Net include:
